The ride home was the same as this morning, popped the whole way, and when I shut her down in the drive she spewed out fuel through the overflow...
I talked to Mike late this evening and he insists that the problems are not related. He says the overflow problem is due to a stuck/sticking needle and seat, and the popping is due to the fuel being too lean on that side...
Tuesday, July 29, 2008
Inaugural work commute...
Finally everything seems to fall in place for me to ride her to work this morning.
She popped the whole way there, and again when I shut her down and put her on her kickstand she spit fuel out the overflow on the left side. Could these two problems be connected?
She popped the whole way there, and again when I shut her down and put her on her kickstand she spit fuel out the overflow on the left side. Could these two problems be connected?
Monday, July 28, 2008
Test Drive through Commerce Township...
After tightening up the headlight bracket some more and adjusting/tightening the mirror, I decided to take her for another ride to work out more bugs.
I decided to take a ride through West Bloomfield, Commerce Twp./Milford area. Riding down Commerce Drive I decided to stop and see Brian & Lynn since I haven't seen them in a while, we ended up B.S'n for hours, I didn't actually leave until 11:30 PM.
I didn't think much of it at the time but when I stopped and set her on her kickstand fuel poured out of the overflow, I simply shut off the petcocks and didn't give it much thought other than the fact that it was leaking fuel on their asphalt drive, not to mention this bitch leaks oil like you wouldn't believe...
On the way home the left cylinder kept "poppin' ", almost like a backfire but more of a sharp pop, mainly while idling at a stop. Again, I haven't a clue why... I'll find out more in the morning on the ride to work...
Sunday, July 27, 2008
Kill Switch Installation...
Since the new battery was drained overnight by some unknown demon in the wiring system, I'll install a kill switch between the battery wire and the fuse block. Turn off the key switch and the kill switch and the battery should remain fully charged.
I put the battery on the charger while I was installing the kill switch and while I was at it I hid as much of my addition to the wiring as I could, routing it in some of that plastic (wire loom) stuff.
Then I ventured out for an evening ride... and as I passed the ABC Harley dealership some evil spirit of a dead Harley rider broke my headlight off. I pulled over and rigged up the headlight, which happened to be dangling by the new wiring harness. Back home I go, to find out that the mounting bracket had been cracked for some time, and snapped from the extra vibration it's received lately.
I spent the next few hours fabricating a bracket. Trying to use the existing mounting holes, which worked fairly well, but I scrapped the idea of duplicating the existing mounting bracket and simplified things by using one single piece of angle iron. Two holes on one side of the angle to mount the bracket, and one hole in the center of the adjacent side of the piece of angle to attach the swivel bracket for the lamp.
It's shortly after sunset and I'm off again to test the headlight in the dark and make any adjustments as I go. The ride was short, too many factors to adjust and the headlamp won't stay tight, so I'll head home and finish this up when I get home tomorrow.
I promised to deliver some wheel dollies to Walt tomorrow, since I forgot to get them Thursday night and couldn't deliver them Friday. So I have to drive the truck...
Friday, July 25, 2008
Battery dead again...
I went out to start her up this morning and the battery was just as dead as the one yesterday...
Obviously it's not the battery... Wasted another chunk of change on a battery that I can't return now that I've put acid in it...
Tonight I'm installing a kill switch... That way I can disconnect any draw on the battery. It might not fix the problem, but it's a temporary solution. I'll figure out the draw issue later.
Thursday, July 24, 2008
Voltage/amp draw issue...
I got home this evening and immediately measured my battery in order for me to run and grab one that is the same size. Meijer didn't have that fit, so I ran back home and pulled out the old one to take to Lakes, and as luck would have it Mike happen to have one in stock. The old style of battery that you have to add the acid to and fill each compartment inside, and make sure you don't spill this acid on anything as your trying to do all this...
I brought it home, filled it up, and let it sit on the charger for a while. About 7:00 I turned the key and kicked her over and she fired right up... I rode around for a while and decided to park it around 8:00 so that I could run to Royal Oak and pick up the log full of bees that I got a call on earlier.
I parked the bike, pulled out the voltage tester to check if there was any significant draw on the battery just in case that's what the original problem was. The voltage read a steady 12.36 volts, didn't appear to be losing anything.
I'll definitely ride her to work tomorrow...
Dead Battery... another day goes by...
I was anxious to get on her this morning and take her to work. I head out of the house, get on her and turn the key, I kick her over and I got no spark whatsoever. I put my hand in front of the headlight and sure enough, the battery was dead...
One more day goes by without being able to ride her to work...
What on earth is wrong with it now? Have I killed the battery? Is there a short in the wiring hack job, causing the battery to discharge? WTF...?
One more day goes by without being able to ride her to work...
What on earth is wrong with it now? Have I killed the battery? Is there a short in the wiring hack job, causing the battery to discharge? WTF...?
Wednesday, July 23, 2008
Air Filters...
I picked up a couple of UNI pod air filters for the chopper from Lakes and then I ran over to the "other" place to pick up the Pilot Jets that I had ordered a few days prior... for some reason my jets had not been ordered, needless to say I was more than a little irritated. The gentleman that was very helpful the day I ordered these jets, could not explain why these jets were not ordered as he had requested, obviously someone else chose to override his decision to please a customer.
I went home and installed these air filters and put the original pilots back in this beast and she fired right up... and stayed running after the idle was adjusted.
I still can't believe that the lack of air filters on this bike would make her run rich and fail to run at an idle, but sure enough, that's all it took to keep her purring. Now I'm glad that I didn't waste a few bucks on those jets, now I'll call them tomorrow and cancel my order they failed to place to begin with, screw'em.
Now that the bike is running with no apparent problems I'm taking her for a ride... finally. A few laps around the neighborhood making my loops bigger and bigger trying to keep a safe distance from home, just in case she decides to quit on me. I passed the Mobil station by the house and thought I should top her off just in case, but changed my mind because I wasn't going to go far, then a mile down the road she starts chuggin'... I looked down at the fuel filters and sure enough they were dry... Hey Mike... come and save me with a gas can...
Meanwhile, Waterford's finest rolls by me, then they decide to make a loop back by and run my plate... Thank God I put plates and insurance on this before my impatience allowed me to take her for a spin without.
She road fairly well, but I did notice that the front shocks need some attention.
I think I'll ride her to work tomorrow...
Tuesday, July 22, 2008
Wiring schematic change...
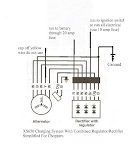
WooHoo... I found a change to the wiring schematic that tells me where the brown wire coming off the rectifier is suppose to go. The brown lead is suppose to go to the ignition through a 10 amp fuse, and the red goes to the battery through a 20 amp fuse. Maybe this will solve all the problems with this nightmare...
I can't wait to get home tonight to make this change and see if this makes a difference...
I can't wait to get home tonight to make this change and see if this makes a difference...
Monday, July 21, 2008
Carburetor tuning continuation...
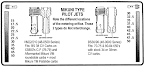
Ok, so after doing some more research I found out that the Pilot Jets that Mike has are for Mikuni VM style carbs, I happen to have the Mikuni BS carbs. These VM Pilot Jets look as if they are the same but the metering orofice is located near the screw head end instead of the tip. The look and fit as if they are interchangeable but they are not. It's no wonder I've been chasing my tail for the past week or so. Now I need to find the BS style Jets.
After shopping around and checking everywhere this evening after work, I finally found a place that could could order these Pilot Jets even though they did not carry them. I can pick them up on Wednesday...
I got home and decided to fiddle with the bike some more and would try to find the VM Pilot Jet that seems to be the closest equivelent to the BS Jet that I need, there seems to be approximately 20 points difference in jet numbers so I'll jump down to a # 25 VM Pilot which should be close to a #45 BS Pilot. I got'em swapped out and she fired right up but then quite suddenly and I couldn't get here started again. The lights seemed real dim so I put the charger on her and gave her a few minutes, turned the key and the lights were real bright, so I gave her a kick and she started right up again. I then decided to take the charger clips off the battery and the negative lead was so hot it burned my thumb. I shut her down and Mike and I tried to trace the problem to see what was wired wrong.
After messing with the wiring for another hour or so with Mike and I butting heads on what needs to be changed we decided to throw in the towel and call it a night. I don't doubt Mike's abilities, but his suggestions don't compute with my brain. I don't understand enough about the circuit in order to troubleshoot any problems that might arise later.
Tomorrow is another day...
Happy Birthday Buckshott...
Happy Birthday wishes go out to my son Drew. I wish I was there...
We should get together and have a few beers... Oh wait, your only Fifteen, sorry I'll have to drink your share since your not of legal age yet. I know somewhere, someone will consume a few Black Label Light's for you...
For all you do... this Bud's for you... when your old enough to drink it Buckshott, the King of Kids... Have a happy day...
Sunday, July 20, 2008
Carburetor tuning continuation...
Since putting in those #50's didn't make a difference, I figured I might as well step up to the #55's, then I tried the #60's. Still nothing... Starts right up, but she won't run at idle, she slows right down and quits without me juicing the throttle.
So since none of those Pilot Jets seem to make a difference I guess I'll have to bite the bullet and take off the valve covers and check & adjust the valve lash. This wasn't quite as labor intensive as I thought it was going to be, and after all that she still didn't run any better.
I'm really lost... I wish I knew what I was doing...
Friday, July 18, 2008
Carburetor tuning continued...
Since changing the Pilot Jet to the #40 made no difference last night, Mike decided to give his buddy a call at Lakes Motor Sports to see what he recommended. His suggestion was to go the opposite direction with the Pilot Jet size and check the valve lash and make sure they were within spec which happens to be .005 +/- .001.
I figured the easiest would be to swap out the Jets again, so I put in #50's and played around with the idle and mixture screws, to no avail...
Time to put the bike away and go put the boat in the water for tomorrow's adventure at Quake on the Lake...
I'll get back to this on Sunday...
I figured the easiest would be to swap out the Jets again, so I put in #50's and played around with the idle and mixture screws, to no avail...
Time to put the bike away and go put the boat in the water for tomorrow's adventure at Quake on the Lake...
I'll get back to this on Sunday...
Thursday, July 17, 2008
Carburetor tuning...
Since Mike insisted that I take the carbs off again and clean them out thoroughly, I did just that, and installed the inline fuel filter on the right hand carb. Found a little bit of sediment in the carb, reaffirming the fact that it is vital to keep a fuel filter on each line coming out of the tank, especially after the bike has sat for a while and allowed rust to develop on the inside of the tank. Now that she's got a full belly of fuel again I'm sure it will continue to rinse the rust out and find its way through her veins.
So now that I have a filter on each line and sprayed out the float bowl with carb cleaner, she should fire right up and we'll be down the road... Well, she fired right up, but I couldn't keep her running. I checked with Mike since he's familiar with tuning carbs and he insisted that I roll this beast over to his garage where we can tune the carbs up.
I pushed her around the block and we pulled the carbs off once again. Which revealed a little more sediment in the bowls and we also pulled out the jets and made sure they were clear, we blew air through all the ports and cleared out any more sediment that might be hiding in the internal chambers of the carbs.
While we had the jets out I figured I would document the size of jets that she has...
After replacing the pilot jets with the #42's we fired her back up and tried adjusting the mixture screws some more and played with the idle but still couldn't get her to run right.
One more day goes by without getting some time in the saddle...
Note: * I found out later that the standard Main Jet for a ('70-'73 XS1-XS2) was a #130, Pilot Jet is #42.5
Note: ** BS30/96 (48-0600 Series)
So now that I have a filter on each line and sprayed out the float bowl with carb cleaner, she should fire right up and we'll be down the road... Well, she fired right up, but I couldn't keep her running. I checked with Mike since he's familiar with tuning carbs and he insisted that I roll this beast over to his garage where we can tune the carbs up.
I pushed her around the block and we pulled the carbs off once again. Which revealed a little more sediment in the bowls and we also pulled out the jets and made sure they were clear, we blew air through all the ports and cleared out any more sediment that might be hiding in the internal chambers of the carbs.
While we had the jets out I figured I would document the size of jets that she has...
- Main Jet: #150 (*)
- Pilot Jet: #42.5 (**)
After replacing the pilot jets with the #42's we fired her back up and tried adjusting the mixture screws some more and played with the idle but still couldn't get her to run right.
One more day goes by without getting some time in the saddle...
Note: * I found out later that the standard Main Jet for a ('70-'73 XS1-XS2) was a #130, Pilot Jet is #42.5
Note: ** BS30/96 (48-0600 Series)
Wednesday, July 16, 2008
Fair maidens inaugural voyage...
I couldn't wait to get home from work today, to take this baby for a spin.
It took me about a half hour of warming her up and working the clutch lever, and repeatedly popping her in gear before the clutch pack broke free. But once she was freed up we were down the road...
I road around the block to Mike's house and revved her up in the driveway for a few minutes to disturb the neighbors, but to no avail, he couldn't hear me over the stereo system boomin' in his boat as he's getting ready for "Quake on the Lake" this weekend. Since I couldn't get a rise out of him, I was on my way to get some road time in.
As I'm pulling into the driveway at home a few hours later the bike stalls, not thinking too much of it I just pushed her up the drive and grabbed the flat black paint to cover the plain pipe fabricated front highway pegs. A few more touch ups and I was headed out again when Mike finally crawled out of the hull of his boat and popped on over to pat me on the back. He was amazed that I actually completed this project without any hitches and had her on the road already. He didn't think I was going to have it all figured out without him, ha... I got tired of waiting and figured it out myself, the worst I could do was wasted a few wires and fuses...
Anyway, as he's standing there I'm trying to get the bike to fire up again and having no luck... The closest I can figure is I clogged up the right hand carb by forgetting to put an inline filter on that side, the left side has a clear inline filter and sure enough there was plenty of rust in it after I had just cleaned it out a few days ago.
Tomorrow nights project is to tear down that carb and clean out the inside again and this time I'll install the filter that's sitting there waiting to be put on...
Tuesday, July 15, 2008
The wiring Octopuss has been slain...
Finally accomplished the task of wiring this monster... The key switch has been wired, fuse block has been implemented, head light and tail light as well.
After much prodding, Mike finally made an appearance. First we discussed testing the head light that I couldn't get to light the night before, and found both the high and low beams to be functional, it was just a bad ground that I had assumed was good. Then I walked him through the wiring that I had run last night. He found nothing wrong with what I had run, which provided me with a great deal of relief. He then started speaking a language I couldn't understand and wanted me to wire the key switch differently and bypass the fuse block and then feed back through the fuse block or something of that nature and it all became very confusing for me because his ideas did not match the wiring schematic in front of me, which is my only hope for tracing a problem. So we butted heads for a bit and then he gave in to my need for black and white, and you can't fix something that ain't broke. So we agreed to disagree for the moment and possibly run the switch differently later, damn electricians seem to be speaking in tongues sometimes and I don't have an interpreter. Mike proceeded to go back to his house alarm installation and left me to sink or swim.
It didn't take me long to finish what had been started the night before. I hooked it all up with only one minor error that was quickly noticed, I had not thought it through properly to realize that the hot wire to the key switch has to be "isolated"... If you don't isolate the hot wire what good is the switch...? duh...
After making sure the key switch, head light and tail lights all work, I proceeded to adjust the brake switch. I then moved onto the task of adjusting the points, and what a task that was... Working with the screws, that looked to be original for this bike and hardly had any meat left on them to allow the screwdriver to bit into, turned out to be quite a chore, involving the removal of two of the screws and robbing a washer from one location that didn't need it as much as the slotted adjuster screw does. I gapped the points to .014 +/- .002
By this time I was anxious to kick this baby over, but before I could do so I had to install the exhaust pipe that Mike had welded for me last week. I looked her over once again to make sure I wasn't forgetting anything and decided she was ready...
It took me a little while of kicking to figure out that one of the plug wires had been knocked off the coil so I put that back on and kicked for a while longer trying to figure out which position the choke was suppose to be in. She finally came to life and I kept trying to give her more throttle but she bogged each time I did. Then it dawned on me that the choke might still be on, and with the flip of the choke lever she settled right down and became very responsive to the grip on the throttle.
Man... what a sense of accomplishment.
Tomorrow nights task is to get the clutch unstuck... the only thing keeping me from taking her for a ride.
Monday, July 14, 2008
Wiring breakthrough...
I was finally able to comprehend enough of the wiring schematic in order to wire it starting backwards from the tail light.
Yesterday, while at Harbor Freight I purchased a package of electrical probes including a continuity tester, at least that way I can figure out how the key switch works and which terminals are for what, that helped out a great deal. I also tested the toggle kill switch only to find out it's a three-way toggle but only two ways work, good thing I didn't take it for granted that it works and wire it up only to add to my frustration of wondering why some of the wiring works and some don't.
Now that I figured out the function of the key switch positions (left, neutral, right) the position to the right is the position that activates all terminals, that gives me a place to start at least. Neutral isolates each terminal, but I'm not quite sure as to what the left position is for as of yet. So I installed the fuse block between the wiring connection from the battery to the key switch, then I ran wires from the tail light to the key switch with a jumper to the head light, from the tail light to the brake switch and from the brake switch to the key switch. Then I ran a red lead from the regulator to the fuse block. I still can't figure what the Brown lead coming from the regulator is for... I can't get the headlight to work with a direct lead, so I'm assuming it needs to be replaced. That will be tomorrow's project.
Sunday, July 13, 2008
Continuation of my wiring nightmare...
Needless to say Mike never made it over to assist me with this mess of spaghetti wiring last night, so I aimlessly walked circles around my bike feeling greatly overwhelmed... but I had this brilliant idea this morning to include inline breakers into this wiring harness, if I could find them. Off to Radio Shack in search of such an animal...
This early on a Sunday morning I'm sure I'm not going to find many places open, so I killed a few hours then headed over to Radio Shack only to find out they still don't open for another half hour, so conveniently Harbor Freight is at the other end of the strip mall, I'll just kill some time over there. The gentleman at Radio Shack was very kind but not very helpful, he tells me there is not such thing as an inline breaker... So I hunted around for other ideas and found a little fuse block to incorporate instead...
Maybe I can conceal this in an Altoids tin under my seat...
Anyway... I get home only to stare at my bike continually scratching my brain trying to figure out which direction to take in tackling this wiring mess... I didn't get very far today either.
Saturday, July 12, 2008
Electrical Nightmare...
I can't ride this bike on the road until this spaghetti wire mess is figured out... Did you notice the mess of wires behind the motor in one of the initial pics posted? Why the previous owner selected to wire this with all the same color is beyond me...
I fabricated an angle bracket in order to attach the license plate and tail light near the rear axle on the frame. Now to wire it up so it works... Looking at the wiring schematic trying to figure out how to draw power for the running light and run it through the brake switch in order for one to have constant power and the brake light to be actuated only when I hit the brake just confuses the daylights out of me... This might as well be written in Latin for all I can make sense out of it...
Sure wish my buddy Mike would come give me a hand like he offered... But he's just as anxious to get his boat in the water as I am to get this bike on the road... So here I sit completely frustrated, while Mike pulls up and says "Hey Bud, let's go take my boat for a test drive out on Loon Lake", so we are off to the lake and then he'll come over to make sense of this nightmare...
Thursday, July 10, 2008
Carburetor cleaning...
I grabbed some carburetor cleaner on the way home tonight so I can tear down those carbs and clean them up real good just to make sure that's not the problem with keeping this girl purring like a kitten. I'm glad I decided to tackle this job because there was a mess of corrosion in the fuel bowl of the left carb, looks as if there was water sitting this bowl for quite a while allowing lime scale to build up and there was green corrosion on all the brass inside. So I took a wire bush and carb cleaner to it and she cleaned up very nice. I put them back on and the right carb just pissed out gas again as soon as I opened up the petcock, so off she came again and I took out he jet once again and sprayed more carb cleaner down her throat, put her back together and re-installed. This time it went back together with no leaks, no drips, no errors.
Then I finished mounting the front hinge for the seat. The springs tend to bend inward and rub on the tire, I'm not sure that I didn't move this pan back too far, but I'll play around with it for a while to come up with another solution. I also bent the base of the extension tabs to give the spring base more outward angle hoping to pull the spring away from the tire. This seems to work fairly well except for the fact that the extension keeps pivoting back towards the tire, I think I'll have to weld a spreader bar between the tabs to keep this off the tire.
But that's enough for the evening, 'til tomorrow.
Wednesday, July 9, 2008
Moving the seat back...
A temporary fix, rather than cutting the existing tabs, I'll experiment with moving the seat back with temporary iron extensions.
Tonight I cut a couple pieces of angle iron and shaped them to use the existing bolt down tabs for the seat springs. The pieces of angle are 6" long, the holes are 5" center to center. I'll bolt the front holes of the irons to the existing frame tabs with the irons extending straight back, then I'll bolt the springs down to the rear most holes in the irons, giving me 5 inches more reach and leg room. I've got to be careful as to where these irons mount so they don't tear up the rear tire.
I also polished the springs the best I could. (Note the original condition of these springs in one of first pics)
I still need to drill a new hole for the front seat hinge.
Tuesday, July 8, 2008
Exhaust Weld...
Thanks to my buddy Mike I was able to get the crack in my right exhaust pipe welded tonight.
Since I plan on wrapping these pipes with Exhaust Wrap anyway, I just figured I would take the cheap & easy route and put a bead of weld on the cracks of this pipe, grind it down a little to smooth it out and remove the slag, wrap it and you'll never see it.
This is the wrap...
that I purchased at Brighton Harley Davidson.
Since I plan on wrapping these pipes with Exhaust Wrap anyway, I just figured I would take the cheap & easy route and put a bead of weld on the cracks of this pipe, grind it down a little to smooth it out and remove the slag, wrap it and you'll never see it.
This is the wrap...
Product ID: 65858-08 Screamin' Eagle® Exhaust Wrap Kits | |
Give your bike the ultimate custom look with Screamin' Eagle® Exhaust Wrap. This premium exhaust wrap is available in solid black or white with printed Screamin' Eagle® script. Each kit includes a 2" x 25' roll of tape and 10 stainless steel ties, enough to complete any Harley-Davidson® air-cooled model application. Fits all H-D® models. Black | |
Saturday, July 5, 2008
Waiting on parts...
Thanks to MikesXS I was able to find some of the parts and hardware that I need to get this beast on the road, unfortunately I didn't order the parts soon enough. Now I'm anxiously waiting the arrival of my package, which won't be here until Tuesday...
These are the parts I ordered:
1.
2.
3.
4.
4.
5.
6.
7.
These are the parts I ordered:
1.
| Lever Shoulder Bolt | |||||||||
| |||||||||
|

2.
| Brake Switch | |||||
|---|---|---|---|---|---|
| |||||
|

3.
| Throttle Cable (Grey) | |||||
|---|---|---|---|---|---|
| |||||
|

| Throttle Cable (Grey) | |||||
|---|---|---|---|---|---|
| |||||
|

4.
| Lower Engine Case Screw Set. - 18pc. | |||||
|---|---|---|---|---|---|
| |||||
|

5.
| XS1/2 Passenger Peg/Muffler Bolts | |||||
|---|---|---|---|---|---|
| |||||
|

6.
| Lever Bolt | |||||
|---|---|---|---|---|---|
| |||||
|

7.
Thursday, July 3, 2008
Chopper Needs & My Wants...
Below is the list of necessary items needed for me to take this baby on her maiden voyage:
1. Wiring:
4. Pegs (Missing Right)
5. Points (Need Adjusted)
Wish List & Wants: (But not necessary before getting on the road)
1. Highway pegs
2. Forward Foot Controls:
4. Seat needs moved back
1. Wiring:
- Head Light
- Tail Light
- Brake Light Switch
- Switch Wiring
4. Pegs (Missing Right)
5. Points (Need Adjusted)
Wish List & Wants: (But not necessary before getting on the road)
1. Highway pegs
2. Forward Foot Controls:
- Shifter Peg
- Brake Pedal
4. Seat needs moved back
Wednesday, July 2, 2008
Points...
I couldn't get this bike to fire up for nothing... finally Mike recommended checking the points. No feeler gauges in my toolbox yet so he grabbed a book of matches and we gapped the points with the cover just to get them close. Just a few kicks later she fired right up... thanks again Mike.
Tuesday, July 1, 2008
Rear fender & Sissy Bar removal...
The rear fender paint is badly chipped and pitted, allowing rust to thrive on the bare metal. I might as well take it off and prep it in case I decide to put it back on. My project for tonight.
The license plate and tail light assembly were attached to the Sissy Bar, so I've got to fabricate a bracket to re-mount them without the rear fender. I'm thinking this bike needs a bracket attached to the rear axle. I'll save that task for another day, I still have plenty of time before this bike is going to be road worthy.
The license plate and tail light assembly were attached to the Sissy Bar, so I've got to fabricate a bracket to re-mount them without the rear fender. I'm thinking this bike needs a bracket attached to the rear axle. I'll save that task for another day, I still have plenty of time before this bike is going to be road worthy.
Saturday, June 28, 2008
Project: Custom Chopper
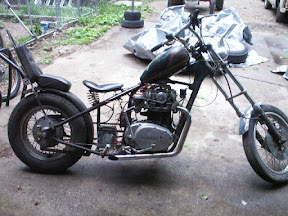
This is the start of my bike project, featuring pictures of the before look.
The picture below displays the tank that was painted and signed by the artist in 1980. I'd like to know the history behind works of art such as this... Was this the owner/artist? Who rendered this idea? Was this the artists interpretation of the dawn of time, was this Eve with dinosaurs? Couldn't have been... that's not a fig leaf...
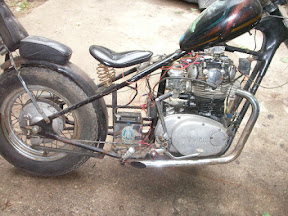
This next shot shows the wiring nightmare I'm about to tackle. At least Dave was kind enough to hook up the wiring enough for me to hear it run... but I can't live with the wires all being the same color, I have to re-wire it close to the original color code, wish me luck...
The picture below displays the tank that was painted and signed by the artist in 1980. I'd like to know the history behind works of art such as this... Was this the owner/artist? Who rendered this idea? Was this the artists interpretation of the dawn of time, was this Eve with dinosaurs? Couldn't have been... that's not a fig leaf...
 |
| From 1972 Chopper |
 |
| From 1972 Chopper |
This next shot shows the wiring nightmare I'm about to tackle. At least Dave was kind enough to hook up the wiring enough for me to hear it run... but I can't live with the wires all being the same color, I have to re-wire it close to the original color code, wish me luck...
 |
| From 1972 Chopper |
 |
| From 1972 Chopper |
 |
| From 1972 Chopper |
Subscribe to:
Posts (Atom)